How to Test a Tester Screwdriver: A Safe DIY Guide for Homeowners
Learn step-by-step how to test a tester screwdriver, verify its live-detection indicator, and safely confirm reliability with common tools. Includes safety tips, practical checks, maintenance, and expert-backed guidance from Screwdriver FAQ.

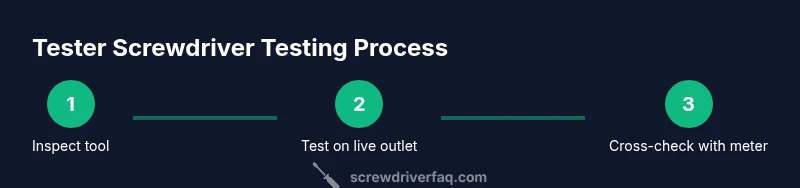
This guide walks you through how to test a tester screwdriver to ensure it detects live circuits reliably and safely. You’ll inspect the tool, confirm the indicator using a known live outlet, and cross-check results with basic voltage checks using safe gear. Following these steps helps prevent electrical mistakes and aligns with Screwdriver FAQ’s practical safety guidance.
What is a tester screwdriver and why test it?
A tester screwdriver is a compact tool with a built-in neon or LED indicator that signals the presence of voltage when the metal tip contacts a live conductor. It’s a handy quick-check for electricians and DIYers working with outlets, switches, or wiring. However, like any detection tool, its reliability depends on proper use and regular verification. How to test a tester screwdriver is a practical skill essential for safe, confident home repairs. According to Screwdriver FAQ, even trusted tools can give misleading readings if they’re damaged or worn, so you should routinely verify your tester screwdriver before heavy-use projects. This small but important habit reduces risk and supports safer, more accurate work in any household electrical task.
The key reasons to test your tester screwdriver
- Ensure the indicator lights when reading a known live circuit to confirm presence of voltage.
- Detect degraded insulation or a damaged tip that could give false readings.
- Build confidence for tasks like outlet replacements, switch wiring, or appliance repairs.
- Maintain a simple safety routine that complements other protective gear and checks.
Testing regularly also reinforces a habit of safety awareness, especially in homes with aging wiring or unfamiliar electrical layouts. By knowing your tool works as intended, you minimize surprises and errors during live work.
How the tester screwdriver compares to other testers
A tester screwdriver is designed for rapid checks and portability. It cannot replace a calibrated multimeter for precise voltage measurements, but it serves as a quick presence detector. For higher accuracy, experts often pair it with a digital multimeter or a non-contact voltage tester to cross-check readings. While a multimeter provides numeric values, the tester screwdriver offers a fast yes/no indication—useful for quick routines and initial safety screening.
Safety first: essential precautions
Before testing any electrical tool, ensure your workspace is dry and clean, your hands are dry, and you’re wearing appropriate PPE such as safety glasses and insulated gloves when handling live components. Keep your footwear non-conductive and stand on a non-slip, non-conductive mat. Never use a tester screwdriver on damaged outlets or exposed conductors with bare hands. If you see cracks in the handle or the plastic is softened, stop using the tool and replace it. Proper storage away from heat and chemicals helps preserve insulation and indicator efficacy.
Common issues and what they mean
If the indicator doesn’t respond when touched to a known live outlet, the tool may be damaged, the indicator lamp may have burned out, or the unit could be out of calibration. A false positive—seeing a glow when there should be no voltage—often points to a compromised insulation or a battery-like component in certain models. In any case, document the symptom, test with a second confirmed tool, and consider replacement if readings remain inconsistent.
Tools & Materials
- tester screwdriver (neon/LED voltage indicator)(Inspect for cracks, damaged insulation, and a clean contact tip before use.)
- non-contact voltage tester (optional but recommended)(Use to verify live status of outlets before using the tester screwdriver.)
- digital multimeter (optional)(Cross-checks voltage values for more precise verification.)
- insulated gloves(Wear when testing or handling wiring in potentially energized areas.)
- safety glasses(Protect eyes from accidental arcing or debris.)
- dry workspace mat(Non-conductive surface to reduce risk of slips and accidental contact.)
Steps
Estimated time: 15-25 minutes
- 1
Inspect the tester screwdriver
Carefully examine the tool for cracks in the handle, damaged insulation, or bent tips. A compromised tool can give unreliable readings or cause electrical shock. If anything looks suspect, set the tool aside and replace it.
Tip: Check the indicator window or LED for crisp illumination when you handle the tip. - 2
Prepare the workspace and PPE
Clear the area, dry hands, and wear safety glasses. Place the tester screwdriver on a non-conductive mat and keep liquids away. Ensure you are standing on a dry surface with shoes that don’t conduct electricity.
Tip: Have a helper nearby if you’re new to testing or working with live circuits. - 3
Test on a known live outlet
Plug the tester screwdriver tip into a known live outlet or touch the tip to a clearly energized conductor with extreme care. Observe whether the indicator lights up within a few seconds. If it lights, note the behavior and proceed to the next check; if not, stop and inspect or replace.
Tip: Do not press hard; a light touch on the conductor is enough to detect voltage. - 4
Confirm no voltage on a known dead target
Using a known safe outlet, contact the tester screwdriver with the live contact separately to ensure there is no glow when the target is intended to be dead. A glow would indicate a fault in the tool or a dangerous wiring condition.
Tip: If unsure, test the same outlet with a second tool to confirm the status. - 5
Cross-check with a secondary device
If you have a digital multimeter or a non-contact tester, verify the same outlet reading with those tools. This cross-check helps validate the tester screwdriver’s reliability and reduces the chance of a false result.
Tip: Document readings to track any drift over time. - 6
Document results and cleanup
Record the outcome of each test, including the outlet tested, observed indicator behavior, and any anomalies. Clean the contact tip and store the tool in a dry, protected case away from heat or chemicals.
Tip: Include date and model in your maintenance log for quick reference.
Quick Answers
What is a tester screwdriver and how does it work?
A tester screwdriver is a compact tool with a built-in voltage indicator that lights when contacting a live conductor. It’s designed for quick voltage presence checks, not for precise measurements. Use it as a safety screening tool and verify results with additional equipment when needed.
A tester screwdriver lights up to show voltage presence and is great for quick checks, though it isn’t a precise meter and should be cross-verified with another instrument.
Can I rely on a tester screwdriver for precise voltage readings?
No. A tester screwdriver indicates presence of voltage, not the exact value. For precise measurements, use a digital multimeter or a specialized voltage tester.
No, it only shows presence of voltage. For exact numbers, use a multimeter or a calibrated tester.
Is it safe to test a tester screwdriver on live outlets?
Testing on live outlets can be safe if you follow PPE guidelines and use dry hands, insulated tools, and proper technique. Avoid damaged outlets or exposed conductors and stop if you notice irregular readings.
It can be safe if you wear PPE and follow good practices, stopping if readings are abnormal.
How often should I replace a tester screwdriver?
Replace the tool if the indicator fails to light on a known live outlet, shows inconsistent readings, or has physical damage to the insulation or handle.
Replace it when readings are unreliable or the tool is damaged.
What should I do if the indicator doesn’t light?
If the indicator doesn’t light after checking a known live outlet, stop using the tool and test with another device to confirm. If unresolved, retire the tool and replace.
If it doesn’t light after a couple of checks, stop using it and replace.
Are there standards for voltage indicators in testers?
Voltage indicators in tester screwdrivers are generally governed by safety guidelines and manufacturer specifications rather than universal standards. Always follow local electrical codes and manufacturer instructions.
There aren’t universal standards for every model; follow the manufacturer’s guide and safety guidelines.
Watch Video
The Essentials
- Inspect the tool for physical damage before use.
- Verify live readings with a known live outlet.
- Cross-check with a secondary instrument if available.
- Follow safety PPE and workspace precautions every time.
- Document results and maintain your tester screwdriver for future tasks.