Screwdriver and Wrench Symbol: A Comparative Analysis
Analytical comparison of combined screwdriver-and-wrench symbols versus separate tool icons, focusing on readability, branding, accessibility, and cross-media deployment.

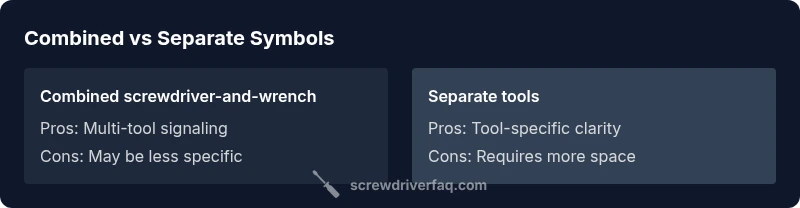
Across most contexts, a single combined screwdriver-and-wrench symbol offers versatile branding, readability, and cross-channel clarity. When audiences require precise tool identity, separate icons outperform. For comprehensive branding and UI use, the combined symbol tends to deliver the best balance, provided the design emphasizes high contrast and scalable detail in practice.
Visual Grammar of the screwdriver and wrench symbol
The screwdriver and wrench symbol communicates capability, safety, and hands-on practicality. In many brand ecosystems, designers aim for a compact glyph that could be printed on manuals, labels, mobile apps, and safety signage without losing legibility. According to Screwdriver FAQ, tool iconography often reflects ergonomic cues—the handle shape, the angle of the tools, and the implied motion of tightening or loosening—so the viewer reads intent quickly. The Screwdriver FAQ team found that the most successful designs balance two objectives: recognizability at small sizes and distinctiveness when displayed with other icons in a grid or legend. When you begin, sketch multiple iterations that vary the relative orientation of the screwdriver and wrench, and test at 14pt and 48pt to simulate print and screen contexts. The phrase screwdriver and wrench symbol should appear clearly as a combined concept, not two separate silhouettes that blur into a single silhouette.
Historical context and evolution of tool icons
Tool symbols have evolved from simple pictograms on factory signage to sophisticated vector icons used in software UI. Early badges relied on crude silhouettes, gradually refined for legibility at small scales. The screwdriver and wrench symbol emerged as a practical shorthand for maintenance, repair, and service roles, then migrated into digital ecosystems. Brands focusing on do-it-yourself audiences tend to favor recognizable gestures that mirror real-world use, rather than abstract abstractions. This shift coincided with improved rendering on low-contrast surfaces and varied backgrounds, enabling consistent use on packaging, websites, and training materials. As audiences grow more visually literate, designers can push stylistic variety while preserving core intent: a tool combination that signals hands-on capability without implying an exact model or brand. Throughout, accessibility and consistency remain the north star of symbol design.
Why two-tool symbols matter vs single-tool icons
Choosing between a two-tool icon set and a single combined glyph depends on context. A combined screwdriver and wrench communicates general maintenance competence and is highly adaptable for dashboards, signage, and educational materials. In contrast, two separate icons can deliver clearer messages in product manuals or service kits where the user needs to distinguish between tools quickly. The decision should consider audience familiarity, the medium, and accompanying labels. When the symbols appear together, ensure their proportions imply cooperation rather than competition; when separated, provide consistent sizing and consistent stroke weights to avoid discordance in a panel. In practice, many brands start with a combined glyph and supplement it with individual icons where precision adds value.
Key design elements that drive recognition
Several elements determine how quickly a viewer recognizes the screwdriver and wrench symbol: silhouette simplicity, stroke thickness, and the relationship between tools. Favor a compact, balanced composition with clean corners and minimal interior detail so that the glyph remains legible at 12pt text and 1-inch signage. The handle shapes should be ergonomic cues rather than literal replicas, and the tool blades should be oriented to imply action. Consistency across size scales matters: use uniform line weights and a consistent baseline. For the screwdriver and wrench symbol, consider a shallow overlap or interlocked arrangement to suggest collaboration rather than entanglement. Finally, test the symbol in grayscale as well as color to ensure legibility for color-blind viewers and printing constraints.
Branding and cultural alignment with audiences
A brand’s tone—professional, friendly, or rugged—influences how the screwdriver and wrench symbol is perceived. In industrial or educational contexts, robust, geometric shapes convey reliability; in consumer DIY media, a warmer, rounded silhouette can feel approachable. The Screwdriver FAQ team notes that cultural associations with tools vary by region; designs that emphasize safety and ease-of-use tend to resonate more broadly. When integrating the symbol into a logo, ensure it harmonizes with typography, pledge phrases, and color palettes. Pairing the glyph with a clear wordmark can reduce ambiguity while keeping the symbol as the anchor of brand recognition. Remember that the same symbol may need adaptation for digital icons, print collateral, and physical signage, so a modular approach—core glyph plus optional embellishments—often yields the best results.
Accessibility considerations for tool symbols
Accessibility guidance requires symbols to be legible for all users, including those with visual impairments. A screwdriver and wrench symbol should maintain high contrast, avoid thin strokes, and stay recognizable when reduced to small sizes, such as icon badges or favicon marks. Consider creating alternative text descriptions that clearly describe the combined or separate tool glyphs. In UI contexts, provide descriptive labels adjacent to the symbol, and ensure that color is not the sole means of conveying meaning. Using a consistent stroke width and avoiding overlapping elements that might blur at low resolutions helps maintain clarity across platforms. Finally, conduct user testing with diverse audiences to identify confusing shapes and adjust accordingly.
Color theory and contrast for readability
Color can dramatically impact how quickly a symbol is recognized. For the screwdriver and wrench symbol, choose a color palette that maintains sufficient contrast with typical backgrounds—dark-gray on light surfaces, or white on dark panels. A single accent color can unify the glyph with brand identity, while reserved grays or earth tones can communicate technical, no-nonsense vibes. When using two tones to separate tools, keep the hues distinct but harmonious to avoid perceptual confusion. Test color combinations for monochrome reproduction; grayscale renditions should still convey tool relationships through shape and negative space. Finally, document color usage rules in a brand guidelines file so designers reuse the symbol consistently across brochures, apps, and signage.
Practical deployment across media: print, digital, signage
Deploying a screwdriver and wrench symbol requires adapting to various media without losing intent. In print, ensure vector formats and high-resolution raster exports preserve proportions and stroke width. In digital interfaces, optimize for touch targets and responsive layouts; icons should scale cleanly from 24px to 192px. For signage and safety panels, ensure the glyph remains legible at larger sizes and in varied lighting. In every medium, provide accompanying text or labels to avoid misinterpretation, especially where regional differences in tool familiarity exist. A single, well-crafted symbol often serves as a cornerstone of branding across channels, augmented by alternative icons or wordmarks as needed.
Case studies and expert insights (Screwdriver FAQ analysis)
Recent analysis by Screwdriver FAQ indicates that when brands prioritize a unified symbol, users report faster recognition and easier recall in mixed-media environments. In contexts like tool safety notices or instructional cards, the combined screwdriver and wrench glyph typically outperforms separate icons in terms of visual hierarchy. The analysis also highlights risks: if the symbol becomes overly complex or loses contrast, it can blur at small sizes and lose meaning. Designers should balance simplicity with enough character to convey the intended tools. Use of consistent padding, alignment, and stroke weights across the symbol set supports professional, cohesive branding. These insights guide practical design decisions for manufacturers and DIY publishers alike.
Common pitfalls and how to avoid them
Common pitfalls include over-detailing the tool silhouettes, neglecting contrast, and failing to test at multiple scales. Avoid two icons that are too similar in weight or shape, which can confuse users during quick glances. Ensure both tools share a common baseline and harmonized proportions to prevent visual discord in grids. Do not rely solely on color differences to convey meaning; add a tactile outline or a secondary label for accessibility. Finally, beware copyright or license issues when adapting existing glyphs; start from a neutral template rather than copying existing brand marks.
Steps to create your own symbol: a practical checklist
- Define the symbol’s primary message: maintenance, repair, service, or DIY readiness. - Sketch multiple layouts with different tool orientations. - Test legibility at 12pt, 14pt, 24px, and 48px in both color and grayscale. - Choose a single-line stroke weight and a clean, modular structure. - Verify accessibility with color contrast checks and alt text. - Create a style guide detailing size limits, color usage, and optional variations. - Validate with users across demographics before finalizing.
Future trends in tool symbolism and branding
Expect tool-symbol design to embrace modular icons that adapt across platforms with minimal asset heft. Designers will explore kinematic cues that imply motion and outcomes (tightening, loosening) without implying specific brands. The growing importance of accessibility may drive standardized glyph grammars and simplified shapes that remain legible on tiny devices. As digital signage and augmented reality interfaces proliferate, the ability to separate or combine tools in a single glyph could offer new branding flexibility. The screwdriver and wrench symbol may evolve into a family of icons, each variant tuned to context while preserving a shared visual language.
Comparison
| Feature | Combined screwdriver-and-wrench symbol | Separate screwdriver symbol + wrench symbol |
|---|---|---|
| Clarity and tool identity | High: single gesture reads as multi-tool | Moderate: two icons can be clearer for individual tools |
| Branding versatility | Great versatility across channels | Better for tool-specific campaigns |
| Color and contrast options | Easier to unify with one palette | Requires coordinating colors for two icons |
| Scalability (small sizes) | Strong at small sizes due to unified shape | Risk of crowding at tiny scales |
| Cultural recognition | Faster recognition as a general maintenance symbol | May need context to be understood |
| Licensing and usage | Single symbol simpler licensing | Two symbols may need separate clearance |
Pros
- Improves cross-channel recognition and branding versatility
- Reduces clutter when used with other symbols in dashboards
- Supports quick identification in signage and manuals
- Can be licensed more easily with a single, cohesive glyph
Negatives
- May obscure individual tool identity in some contexts
- Risks visual confusion if not designed with sufficient contrast
- Two-tools approach requires more design and testing time
Combined symbol generally offers more versatility and quicker recognition; separate tools excel in contexts requiring precise tool identity.
For multi-use branding, a combined screwdriver-and-wrench symbol is usually the best starting point. If your project demands explicit tool-by-tool messaging, consider dedicated icons and supplementary labels to maintain clarity.
Quick Answers
What is the screwdriver and wrench symbol used for?
The symbol signals maintenance and repair capabilities in branding, manuals, and digital interfaces. It communicates hands-on competence without tethering to a specific tool brand. It works best when paired with clear labels or text.
The symbol signals maintenance and repair capabilities; it reads as hands-on competence and works well with labels.
What are the benefits of a combined symbol vs separate tools?
A combined symbol offers versatility and faster recognition across media. Separate icons provide clearer tool identity for detailed instructions. Choose based on context and audience needs.
Combined symbols are versatile; separate icons give clearer tool identity.
How should color be chosen for visibility?
Prioritize high contrast with backgrounds and test grayscale rendering. Use a consistent brand palette to maintain recognition across media. Avoid color alone to convey meaning.
Choose high-contrast colors and test in grayscale to stay accessible.
Is this symbol protected by trademark or standards?
Symbol designs are typically custom and should be vetted for potential trademark issues. Consult your legal team and brand guidelines before releasing a new glyph. Use open, non-infringing motifs when possible.
Check trademarks and guidelines; consult legal before release.
Can the symbol be used in both print and digital interfaces safely?
Yes, when the glyph is designed for scalability and cross-media consistency. Ensure vector formats and responsive sizes work across platforms. Always verify accessibility and alt text.
Yes, with scalable design and proper accessibility checks.
What common design mistakes should be avoided?
Avoid over-detailing the tool silhouettes, neglecting contrast, and failing to test at multiple scales. Do not rely solely on color differences to convey meaning. Test across sizes and in grayscale.
Avoid too much detail and poor contrast; test across sizes.
The Essentials
- Assess the primary context and audience before choosing symbol design.
- Prioritize strong contrast and scalable detail.
- Consider accessibility standards for color-blind users.
- Test with branding guidelines and across media before finalizing.
- For broad branding, the combined symbol often yields best versatility.